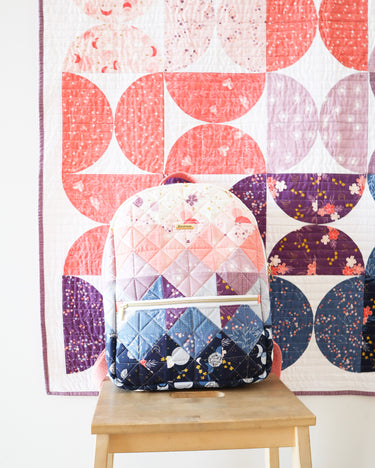
I am so excited to share this project with you today! I don’t usually sew things that are… not quilts. But this was one exception, and I love (LOVE) how this quilted backpack came out!

In the last couple of years, I have found myself traveling at least 2-3 times per year. Usually, I go to QuiltCon in February, then Garden of Quilts in September, and then manage to sneak in another trip somewhere in between. During these travels, I’ve realized I like having a backpack for my “personal item” on the plane. I like being able to stuff my Kindle, iPad, headphones, maybe a water bottle, etc, and have it all handy. I don’t carry a big purse, and I like having my hands free when traveling, so a backpack has become a must.
Over the years, I’ve tried no less than 3 different backpacks/purses, and there’s always something I’m not quite happy with. So last fall, right before Garden of Quilts, I decided to make my own backpack.
I’ve seen many other quilters make their backpacks, so how hard could it be?
Turns out, it’s a little hard. Especially when it’s your first time making one, and you decide to –
1) upsize the backpack in the pattern you’re following
2) pick an ombre patchwork design
3) want all the ombre patchwork to match on all sides.
If you’re making a backpack for the first time, don’t do any of those things. Maybe the ombre patchwork would be okay, but don’t try to make it match on your first try. Trust me.
But I digress!
Backpack Pattern
After looking online for a while, I decided to follow the Violet Backpack pattern by Knot and Thread Design. But as I mentioned above, I decided to upsize the pattern. That’s because the Violet backpack is toddler-size, and I wanted something that could hold my iPad in it, plus a few other things. So, instead of the 11” x 9” size, I made mine roughly 17” x 11”.
Overall, the pattern is pretty easy to follow. As I said, I made things more difficult for myself, which is in no way the pattern’s fault. Hi, it’s me, I’m the problem, it’s me. I really like the way the instructions are written. It’s all really easy to follow, and if you’re looking to make a backpack for the first time, I recommend this pattern!
Ombre Design
Before starting this project, I knew that I wanted to use my Moonchild fabric collection. However, I couldn’t design which of the prints to use, so I thought… why not use (almost) all of them? I played around with some fabric I had left over from my advanced yardage and decided to do an ombre design while leaving out the yellows in the collection. I decided to do this because the color progression just worked better this way.

I briefly considered doing the math to make the patchwork work with shortcuts but decided instead to make these quarter triangle squares the old-fashioned way – by cutting each triangle and then piecing them together into 4.5” squares (4” finished). I just really wanted each print to be in a specific place, and this was the easiest way to accomplish that.


Finishing Touches
For the lining, inside pockets, and binding, I went with a solid light pink and coral combo – Confetti Cottons in Ballerina and Coral. These two solids perfectly match the pinks on the fabric, so they were the perfect combo to use.


I got all of the hardware (zipper, D rings, etc) at Sallie Tomato in Gold. The little “handmade” label on the front is one of my favorite details I added!


Overall, I am extremely happy with how this backpack turned out! I’m already planning my next one for this fall when my next fabric collection comes out. I will modify a thing or two again, just for ease of sewing and personal preferences regarding wearing and using the backpack. But for now, admire this little cutie!


Project Information
Fabric: Moonchild Fabric for Riley Blake Designs (outside), Confetti Cottons in Ballerina (lining) and Coral (pockets and binding)Pattern: Violet Backpack (modified)
Zippers: White Nylon in Gold
Label: Script Handmade in Gold


I loveeee how this turned out! I’m working with the Archie backpack from the same studio but like a big backpack. How did you go about upscaling the bag?
Perfect job on the colors and modifications! Do you or the pattern designer have the new sizing available? I struggle too with making changes!