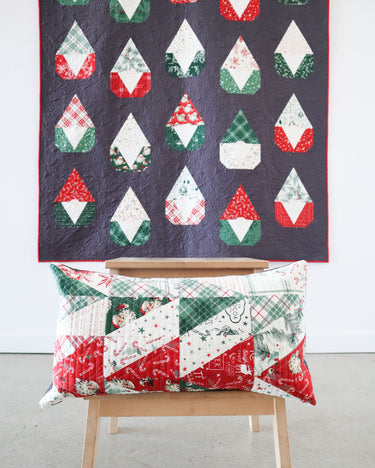
One of the things I struggled with while working on the Nordic Gnome quilt pattern was the waste produced during some of the trimming. It seemed like a lot of waste, but also it was the most beginner-friendly way to make those units happen. After some thought, I decided why not use those pieces? So I did one quick HRT test and it was perfect so I got to work on a HRT pillow cover!
I grabbed all of the trimmings from my Hat section and mixed and matched them. I probably spent about an hour until I found a layout I liked. In the end, I went with a scrappy look that creates the illusion of larger triangles together. It uses 16 HRTs units in a 4 x 4 arrangement.
Depending on the fabric you used for your Nordic Gnome quilt, you can layout the HRT units slightly differently for a different look while still using the 4 x 4 arrangement to fit a lumbar pillow.
Note: I tried really hard to get this to work for a square pillow and it just wasn't happening for me but it's certainly possible!
Making the HRTs
After I found an arrangement I liked, I sewed my triangle scraps together to create the HRTs. I just put them right sides together, making sure to keep the wider end of the triangles in opposite ends.
Once they were sewn together, it was time to trim. After some quick math, I trimmed my HRTs to 6" x 3.5". Trimming was probably the hardest part of this while extra project - I had never done HRTs before! This tutorial by my friend Amber was extremely helpful during this step and I highly recommend checking it out if you haven't trimmed HRTs before.
After the trimming, it was just a matter of sewing the HRTs together into a lil' quilt top. I love how cute this looks over my pressing table.

Quilting the Top
For the quilting, I decided to do some easy straight line quilting. I simply lined up my walking foot to a seam, and then lined up that quilting line with the edge of my walking foot to do 1/2" lines.
However, once it was all said and done I wanted to add some more quilting, so I added some accents that follow the HRTs seams on the diagonal. For a quick moment I had some doubt (was this too much quilting?!) but I truly love the end result.
Once I was done quilting, I trimmed the whole top to 12.5" x 22".


Make the Pillow Cover
To finish up the pillow cover, I created the back envelope panels. I took some left over fabric I had for my background and cut two pieces - 12.5" x ... and 12.5" x 8". I folded one of the 12.5" edges on each piece twice and pressed with an iron to create a finished edge.
I love using a blanket stitch (under applique stitches in my machine) for this because it gives the back an extra little fun detail.
Once I was done hemming the edges, I placed my two pieces right sides together with my top. Laying down first the small piece, then the large piece, and sewed a 1/4" seam around the whole edge. Then it's just a matter of turning the whole cover right side out and stuffing it with the pillow insert.
I used this pillow insert. It's 12" x 20" so not a perfect match for the cover, but it's close enough to make it work.
I love, love how this bonus project came out and I cannot wait to have this little cutie out on the couch during the holidays!


Hello