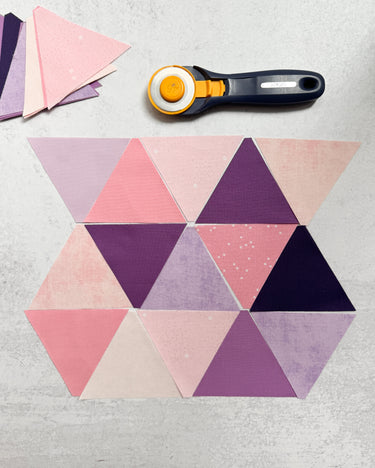
Whether following a pattern or drafting your own project, mastering the 60º triangle will open up a world of creative possibilities. In this blog post, I'll guide you through piecing perfect 60º triangles, so let’s dive in!
PS: If you're a visual learner, there's a video tutorial at the end!
Tools You'll Need
In general, 60º triangles don't require any special tools outside of what you might already have.
- Rotary Cutter
- Ruler and Cutting Mat: Many rulers and cutting mats come with 60º markings. You can also make use of paper templates included in patterns or purchase a 60º Specialty Ruler
- Fabric: If this is your first time working with 60º rulers, stick to quilting cotton. Avoid textured or woven fabrics until you're more comfortable with this technique.
- Pins
Cutting 60° Triangles
Before we get into piecing 60º triangles, here are some tips on cutting them.
First, I highly recommend starching your fabric before cutting your triangles. The sides of your triangles will be cut on the bias, making those edges stretchy. Using starch makes the triangle easier to handle and less likely for those biased edges to warp.

Second, the easiest way to cut your triangles, whether you are following a pattern, using a template/specialty ruler, or a regular ruler, is to cut a WOF strip x the height of your triangles. I prefer to use a 60º specialty ruler–my favorite one is the Creative Grid ruler, with the blunt top for easier piecing.
Pointy-End vs. Blunt-End Rulers: If you are using a 60º ruler AND following a pattern, check whether your ruler has a pointy or blunt end and what the pattern's templates look like. For example, my Nordic Gnome and Night Court patterns have a blunt end at the top. If you try cutting your templates with a pointy-end ruler, you'll need to slide your ruler up ¼" to simulate the blunt tip. Otherwise, your triangles will be the wrong size after piecing.
Arranging Your Triangles
From now on, for this tutorial, I'll assume the triangles have been cut with a blunt end since this is how all of my patterns' templates are done.
Whether following a pattern or making your very own triangle project, step one is always arranging the triangles. More so than with other projects, I find this crucial–otherwise, I end up with triangles in random spots, rows too long, etc.
As you arrange your triangles, ensure the blunt ends are always up or down–not off to the side.

Piecing the Triangles
I like to work in pairs when piecing triangles. So, starting with the first row, place the second triangle, right sides together, on top of the first triangle.
Alignment is critical here. Make sure they are perfectly on top of one another before sewing. You'll know you have a perfect ¼" seam allowance if your stitch line hits the blunt end just right.


Then press your seams open. I always say pressing is, 99% of the time, a matter of personal preference. This is one of those times that fall in the 1% where pressing matters. Pressing your triangles to the side will result in too thick seams when joining rows together, and the rows will be more challenging to match up, so press open!
Continue piecing triangles together in pairs. If your rows have an odd number of triangles, leave the last one as a single.


Once all your pairs are sewn together, flip the second set on top of the first set, as shown. Align the points and dog ears on both sets. Sew and press seams open.
This would be a good point to check your seam allowance. With a ruler, check that the point of each triangle is ¼" from the edge.

Continue this process until your rows are all sewn together.
Sewing Your Rows
Once your rows are sewn together, place the first two rows right sides together. I generally avoid pinning while sewing as much as I can. However, I always use pins when sewing rows of triangles together to ensure those points meet just right.
So, after placing the two rows right sides together, check that your points meet exactly, and pin on either side of each point, all the way down the rows.

If you're having trouble matching the points, put a pin at the exact point where the triangles meet on both rows. Then, add pins on either side of this pin before removing it.
Sew the rows together with a ¼" seam, and press seams open.

And that's it! Sewing 60º isn't as scary as it seems, I promise! Just go slow and get lots of practice.
I hope you found this tutorial helpful in sewing 60° triangles!
–
Video
If you're more of a visual learner, here's a video tutorial for you!


Thank you so much for this tutorial. It saved my triangles and quilt.