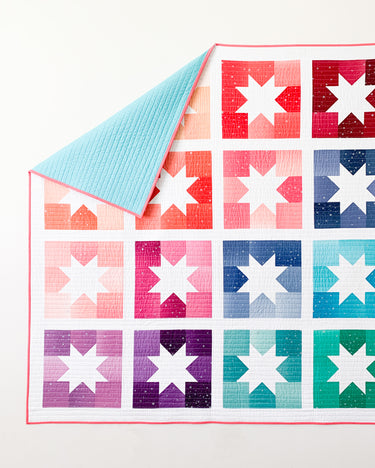
Joyful Stars quilt pattern is now available in the shop!
Every once in a while, when motivation is off and sitting at either my sewing machine or my computer sounds akin to torture, I take out some paper and pencil and sit down to doodle. I draw random shapes, other times shapes that might become a quilt block. Joyful Stars came from such a drawing session.
After a few minutes of doodling during this one doodling session, I focused on the Sawtooth Star. It's such a beautiful, classic shape in the world quilting. I've always loved it and knew I wanted to create a quilt that featured this shape. True, I had Stellar Mosaic in the works, but I wanted something simpler. Something scrappier. I ended up drawing 5 or 6 different block options before I landed on the one that would finally become Joyful Stars. I just loved the idea of the star itself being off-set by color tiles.

But then life got crazy, as it does, and I had to focus on a million other things. That is until Vannesa from V and Co asked me if I'd want to sew with her upcoming fabric collection, Fairy Dust Ombre. The words ombre and metallic stars caught my attention and I typed YES in all caps before I even finished reading her message!
I immediately knew that Joyful Stars and Fairy Dust Ombre were meant to be. Once I received the fabric in late January, I couldn't wait to get started! And once I finished my first block, there was no stopping. This was everything I thought it'd be and then some!


Out of the 32 colors, I only needed half, and I had the hardest time picking out the lucky 16. I knew I wanted a rainbow-ish arrangement for the final blocks, similar to what I did with my Ombre Hexie Blooms, so I worked off that idea. I tried picking out my favorites first, but some of them didn't work to they went back into the pile - this just means there's another ombre quilt in my future, haha!
Honestly though, I don't think I could love the end result anymore than I already do. It's so happy and bright - exactly what I needed while there's a pandemic going on.
For the finishing touches, I wanted something simple that wouldn't distract from the gorgeous fabric. So, for both the binding and the backing, I used some solid fabric. And for the quilting, I did some classic 3/4" apart, straight-lines on my trusty Janome 9450.


Purchase the Pattern
pin for later


